
🎮 Taking Control: Build Your Own Wireless Joystick for Robots
If you’ve ever tried controlling a robot with clunky buttons or laggy apps, you know — nothing beats the smooth, real-time feel of a joystick.
Now imagine building your own wireless joystick controller that talks to your robot from across the room.
Sounds cool? Let’s dive into how you can actually make it happen!
🤖 What Is a Wireless Master Joystick Controller?
In simple terms, it’s a remote control system that lets you move your robot using a joystick — without wires.
Think of it like the controller for a video game, but you’re driving an actual bot around your room, field, or lab.
You move the stick — the robot moves. No lag. No cords. Pure control.
🎯 Why Build One?
Here’s why this project is a must-try for students and makers:
✅ Wireless Freedom – Control your robot from a distance (no chasing cables!)
✅ Joystick Precision – Smooth analog movement in all directions
✅ Real-Time Response – Immediate feedback with no lag
✅ Great for Robotics Projects – Control rovers, cars, arms, and more
✅ Fully DIY & Customizable – Add more buttons, sensors, and features as you grow
🧠 How It Works (Plain and Simple)
Your joystick setup consists of two main parts:
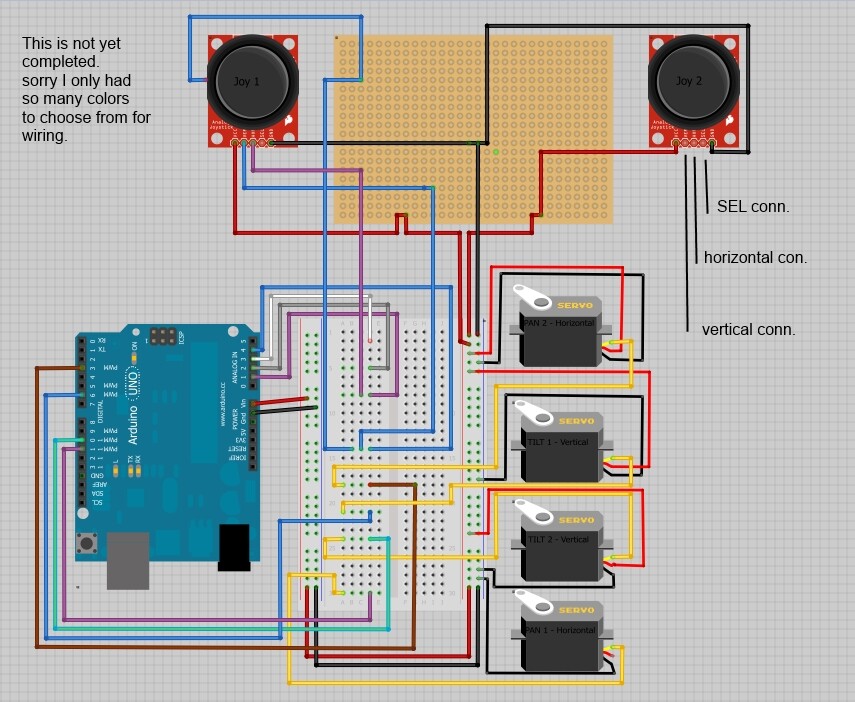
- 🎮 Transmitter – The handheld controller with joystick(s), powered by Arduino and an RF or Bluetooth module
- 🚗 Receiver – Mounted on the robot, it listens for commands and acts accordingly
Here’s what happens:
- You push the joystick forward → Arduino reads it as analog input
- Wireless module (like NRF24L01, HC-05 Bluetooth, or ESP-NOW) sends the data
- Robot receives it and moves forward, backward, left, or right based on your input
And voilà — you’ve got a wireless robot that follows your fingers.
🔩 What You’ll Need
| Component | Purpose |
|---|---|
| Arduino Nano/Uno/ESP32 | Microcontroller for both transmitter and bot |
| Joystick Module | Main input — like a gamepad stick |
| Wireless Module (e.g., NRF24L01 / HC-05) | Sends and receives signals |
| Power Supply / Batteries | To run both controller and robot |
| Motors and Motor Driver (L298N, etc.) | To move the robot based on input |
| Chassis + Wheels | Your robot base |
| Optional: Buttons/LEDs | For extra controls or feedback |
🛠️ Build Ideas – Where to Use It
You can apply this wireless joystick system to:
- 🚙 DIY Car or Rover Bots
- 🎯 Target-Following Robots
- 🦾 Robotic Arms with Directional Movement
- 🚜 Agriculture or Field Robots
- 🤖 Maze Solving Bots (with manual override)
You can even drive robots through obstacles or narrow paths with joystick precision — something not possible with on/off buttons.
🎓 What You’ll Learn by Building This
This project is more than just fun — it teaches you real engineering principles:
- How to read analog joystick inputs and map them into directions
- How to use wireless modules and troubleshoot range issues
- How to control motors in real-time based on data
- How to build a responsive, reliable remote controller
- How to design user-friendly, handheld electronic hardware
Great for final-year projects, competitions, or robotics club challenges.
🚀 Pro Tips & Add-On Ideas
Want to supercharge your joystick controller?
- 💬 Add an OLED Display – Show battery, signal strength, or mode
- 🎚️ Add Multiple Modes – Speed mode, arm mode, lights, etc.
- 🔋 Battery Level Indicator – So you’re never caught off-guard
- 📶 Use Wi-Fi or LoRa for long-range control
- 📱 App + Joystick Hybrid – Use both phone and joystick together
Your controller, your rules.
💬 Final Thoughts: Control in Your Hands
A Wireless Joystick Controller is one of those projects that looks advanced, feels professional, and is surprisingly fun to build.
More importantly, it gives you complete control — over your robot and over what you create next.
So whether you’re driving a rover across the room or presenting a smart robotic arm in a college fest, this project helps you stand out — with your thumbs on the controls.
📥 Ready to Build Yours?
Want the full guide?
- ✅ Arduino code for transmitter and receiver
- ✅ Circuit diagrams and wiring tips
- ✅ Chassis building guide for your robot
- ✅ Bonus: Add voice or gesture control!
Drop a comment below or message me — and let’s get building!