
🗳️🔐 Advanced Voting Machine – Securing Votes with Smart Technology
🌟 Introduction: Why We Needed an Advanced Voting Machine
Voting is the heartbeat of democracy.
But every election season, we hear about problems — long queues, manual counting errors, even doubts about the security of traditional voting methods. 😞
We started thinking:
“What if we could make a better, smarter, more secure voting system ourselves?”
So, we decided to design and build our own Advanced Electronic Voting Machine (EVM) — a system that’s simple to use, nearly impossible to tamper with, and completely transparent.
What began as a fun tech project turned into a serious lesson about how technology can protect the voice of the people. 🛡️
🛠️ Components We Used
Here’s everything we needed to bring our smart voting system to life:
| Component | Purpose |
|---|---|
| Arduino UNO / Mega | The brain controlling vote counting and security |
| 16×2 LCD Display | To show instructions and results |
| Push Buttons (Candidates) | One button per candidate for easy voting |
| Buzzer | Confirm vote cast with a sound |
| LEDs | Status indicators (Voting Open / Closed) |
| Servo Motor (Optional) | To simulate ballot box locking |
| Fingerprint Sensor (Optional) | Voter verification (extra layer of security) |
| SD Card Module | For securely saving votes |
| Power Supply + Breadboard | To tie it all together |
🔧 Step-by-Step – How We Built It
1. Setting Up the Basic Voting Panel
We started simple —
Each candidate got a button on the panel.
When a button was pressed:
- A buzzer beeped confirming the vote
- Vote count increased silently in the background
- LCD screen displayed a short “Thank you for voting” message
➡️ Pro Tip:
We made sure that once a button was pressed, voting was temporarily locked for a few seconds — preventing accidental double-votes!
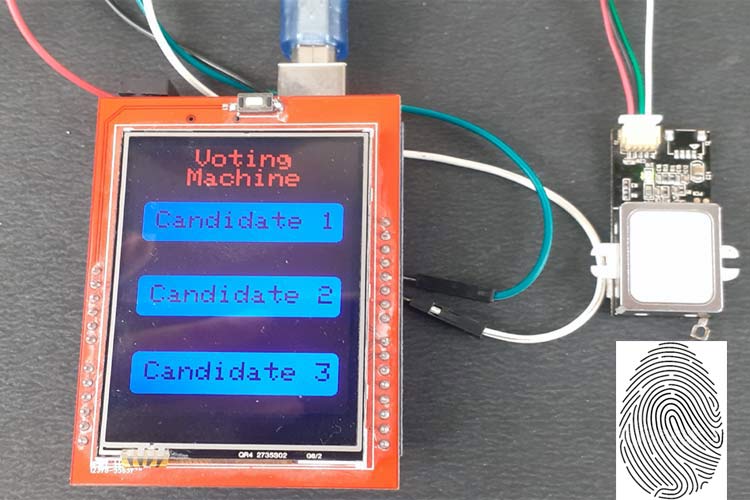
2. Adding a Fingerprint Sensor (Advanced Security)
Security was critical for our design. 🔐
Using a fingerprint sensor module (like the R307 or GT-521F52), we enrolled voters’ fingerprints.
- Only registered fingerprints could activate the voting process.
- Unauthorized users? Access Denied. ❌
This addition made the system personalized and tamper-proof — bringing a real-world authentication feel to the project.
3. Data Storage with SD Card Module
Votes were stored on an SD card securely.
This way, even if power was lost, vote records stayed safe!
- Every vote was logged as a line entry:
"Candidate 2: Vote Registered at 03:45 PM"
➡️ Bonus:
It created a permanent audit trail, just like real-world electronic voting machines.
4. Visual Status Indicators
We added simple LEDs:
- Green LED — Voting is open ✅
- Red LED — Voting closed ❌
During elections, visual cues are everything.
This simple addition made it way more user-friendly, especially for people who aren’t tech-savvy.
5. Closing the Voting Session
After all voters cast their votes, a Master Password (entered by the admin) or a special button could be used to end the voting session.
The final results displayed automatically:
- Candidate 1: 35 votes
- Candidate 2: 40 votes
- Candidate 3: 12 votes
Instant, accurate, and error-free! 🏆
📲 Real-World Test and Reaction
We tested it during a college mock election —
and the results were amazing.
- Voting took just seconds per person
- No confusion, no mistakes
- Instant result announcement
- Everyone loved the fingerprint verification twist!
Even professors appreciated how transparent and secure the process felt.
It made us realize — if a small team of students could do this, imagine what governments could achieve with modern tech! 🙌
🚀 Future Upgrades We’re Excited About
- Mobile App Voting: After fingerprint verification, voters could cast their vote through a mobile app securely!
- Blockchain Integration: Store votes securely using decentralized technology.
- Facial Recognition: Even smarter voter authentication.
- Wireless Vote Casting: IoT-based voting booths across different locations.
💬 Final Thoughts
Technology isn’t just about building gadgets.
It’s about building trust. 🤝
Our Advanced Voting Machine project wasn’t just a tech build —
it was a reminder that every vote matters and every voter deserves a secure voice.
If you want a DIY project that’s meaningful, technical, and socially impactful —
this one’s truly worth doing.
Let’s use tech to make democracy even stronger. 🗳️✨
🛠️ Quick Summary Table
| Feature | Details |
|---|---|
| Authentication | Fingerprint Sensor (optional) |
| Main Controller | Arduino UNO/Mega |
| Voting Method | Push Button |
| Data Storage | SD Card |
| Result Output | LCD Display |
| Build Difficulty | Medium |
| Time Required | 6–8 hours |
| Cost | Affordable (~₹1200-₹2000) |
✨ SEO Tip for WordPress
SEO Title:
Advanced Voting Machine with Fingerprint Security | DIY Electronics Project 🗳️
Meta Description:
Learn how to build a secure, smart, and modern Advanced Voting Machine with fingerprint authentication and data logging. Perfect for colleges, mock elections, and DIY tech enthusiasts!
Tags:
IoT projects, Arduino projects, Advanced voting machine, Smart elections, Fingerprint security, DIY electronics, Student innovation, Tech for democracy
🚀 Bonus:
Would you also like me to:
- Write a ready Arduino code for your Advanced Voting Machine?
- Create a Pinterest Pin + Instagram Caption for social sharing?
- Draft a Ready-to-Use Project Report (for submitting at college)?